Deploy a model#
Before you start…
Please check our “Before you start” guide to go over a few preliminary topics.
This tutorial was written for Jina 3.14
It will probably still work for later versions. If you have trouble, please ask on our Discord.
Introduction#
In this tutorial we’ll build a fast, reliable and scalable gRPC-based AI service. In Jina we call this an Executor. Our Executor will use Stable Diffusion to generate images from a given text prompt. We’ll then use a Deployment to serve it.
Note
A Deployment serves just one Executor. To use multiple Executors, read our tutorial on building a pipeline.
Run this tutorial in a notebook
You can also run this code interactively in Colab.
Understand: Executors and Deployments#
All data that goes into and out of Jina is in the form of Documents inside a DocList from the DocArray package.
An Executor is a self-contained gRPC microservice that performs a task on Documents. This could be very simple (like merely capitalizing the entire text of a Document) or a lot more complex (like generating vector embeddings for a given piece of content).
A Deployment lets you serve your Executor, scale it up with replicas, and allow users to send and receive requests.
When you build a model or service in Jina, it’s always in the form of an Executor. An Executor is a Python class that transforms and processes Documents, and can go way beyond image generation, for example, encoding text/images into vectors, OCR, extracting tables from PDFs, or lots more.
Install prerequisites#
In this example we need to install:
The Jina framework itself
The dependencies of the specific model we want to serve and deploy
pip install jina
pip install diffusers
Executor: Implement logic#
Let’s implement the service’s logic in text_to_image.py. Don’t worry too much about understanding this code right now – we’ll go through it below!
import numpy as np
from jina import Executor, requests
from docarray import BaseDoc, DocList
from docarray.documents import ImageDoc

class ImagePrompt(BaseDoc):
    text: str


class TextToImage(Executor):
    def __init__(self, **kwargs):
        super().__init__(**kwargs)
        from diffusers import StableDiffusionPipeline
        import torch
        self.pipe = StableDiffusionPipeline.from_pretrained("CompVis/stable-diffusion-v1-4", torch_dtype=torch.float16).to("cuda")

    @requests
    def generate_image(self, docs: DocList[ImagePrompt], **kwargs) -> DocList[ImageDoc]:
        images = self.pipe(docs.text).images  # image here is in [PIL format](https://pillow.readthedocs.io/en/stable/)
        for i, doc in enumerate(docs):
            doc.tensor = np.array(images[i])
Imports#
from docarray import DocList, BaseDoc
Documents and DocList (from the DocArray package) are Jina’s native IO format.
from jina import Executor, requests
Jina’s Executor class and requests decorator - we’ll jump into these in the next section.
import numpy as np
In our case, NumPy is specific to this Executor only. We won’t really cover it in this article, since we want to keep this as a general overview. (And there’s plenty of information about NumPy out there already).
Document types#
We then import or create the data types on which our Executor will work. In this case, it will get ImagePrompt documents and will output ImageDoc documents.
from docarray import BaseDoc
from docarray.documents import ImageDoc

class ImagePrompt(BaseDoc):
    text: str
Executor class#
class TextToImage(Executor):
    def __init__(self, **kwargs):
        super().__init__(**kwargs)
        import torch
        from diffusers import StableDiffusionPipeline

        self.pipe = StableDiffusionPipeline.from_pretrained(
            "CompVis/stable-diffusion-v1-4", torch_dtype=torch.float16
        ).to("cuda")
All Executors are created from Jina’s Executor class. User-definable parameters (like self.pipe) are arguments <executor-constructor> defined in the init()` method.
Requests decorator#
@requests
def generate_image(self, docs: DocList[ImagePrompt], **kwargs) -> DocList[ImageDoc]:
    images = self.pipe(docs.text).images  # image here is in [PIL format](https://pillow.readthedocs.io/en/stable/)
    for i, doc in enumerate(docs):
        doc.tensor = np.array(images[i])
Any Executor methods decorated with @requests can be called via an endpoint when the Executor is run or deployed. Since we’re using a bare @requests (rather than say @requests(on='/foo')), the generate_image() method will be called as the default fallback handler for any endpoint.
Deployment: Deploy the Executor#
With a Deployment you can run and scale up your Executor, adding sharding, replicas and dynamic batching.
We can deploy our Executor with either the Python API or YAML:
In deployment.py:
from jina import Deployment

dep = Deployment(uses=TextToImage, timeout_ready=-1)

with dep:
  dep.block()
And then run python deployment.py from the CLI.
In deployment.yaml:
jtype: Deployment
with:
  uses: TextToImage
  py_modules:
    - text_to_image.py # name of the module containing your Executor
  timeout_ready: -1
And run the YAML Deployment with the CLI: jina deployment --uses deployment.yml
You’ll then see the following output:
──────────────────────────────────────── 🎉 Deployment is ready to serve! ─────────────────────────────────────────
╭────────────── 🔗 Endpoint ───────────────╮
│  ⛓      Protocol                   GRPC │
│  🏠        Local          0.0.0.0:12345  │
│  🔒      Private      172.28.0.12:12345  │
│  🌍       Public    35.230.97.208:12345  │
╰──────────────────────────────────────────╯
Running in a notebook
In a notebook, you can’t use deployment.block() and then make requests with the client. Please refer to the Colab link above for reproducible Jupyter Notebook code snippets.
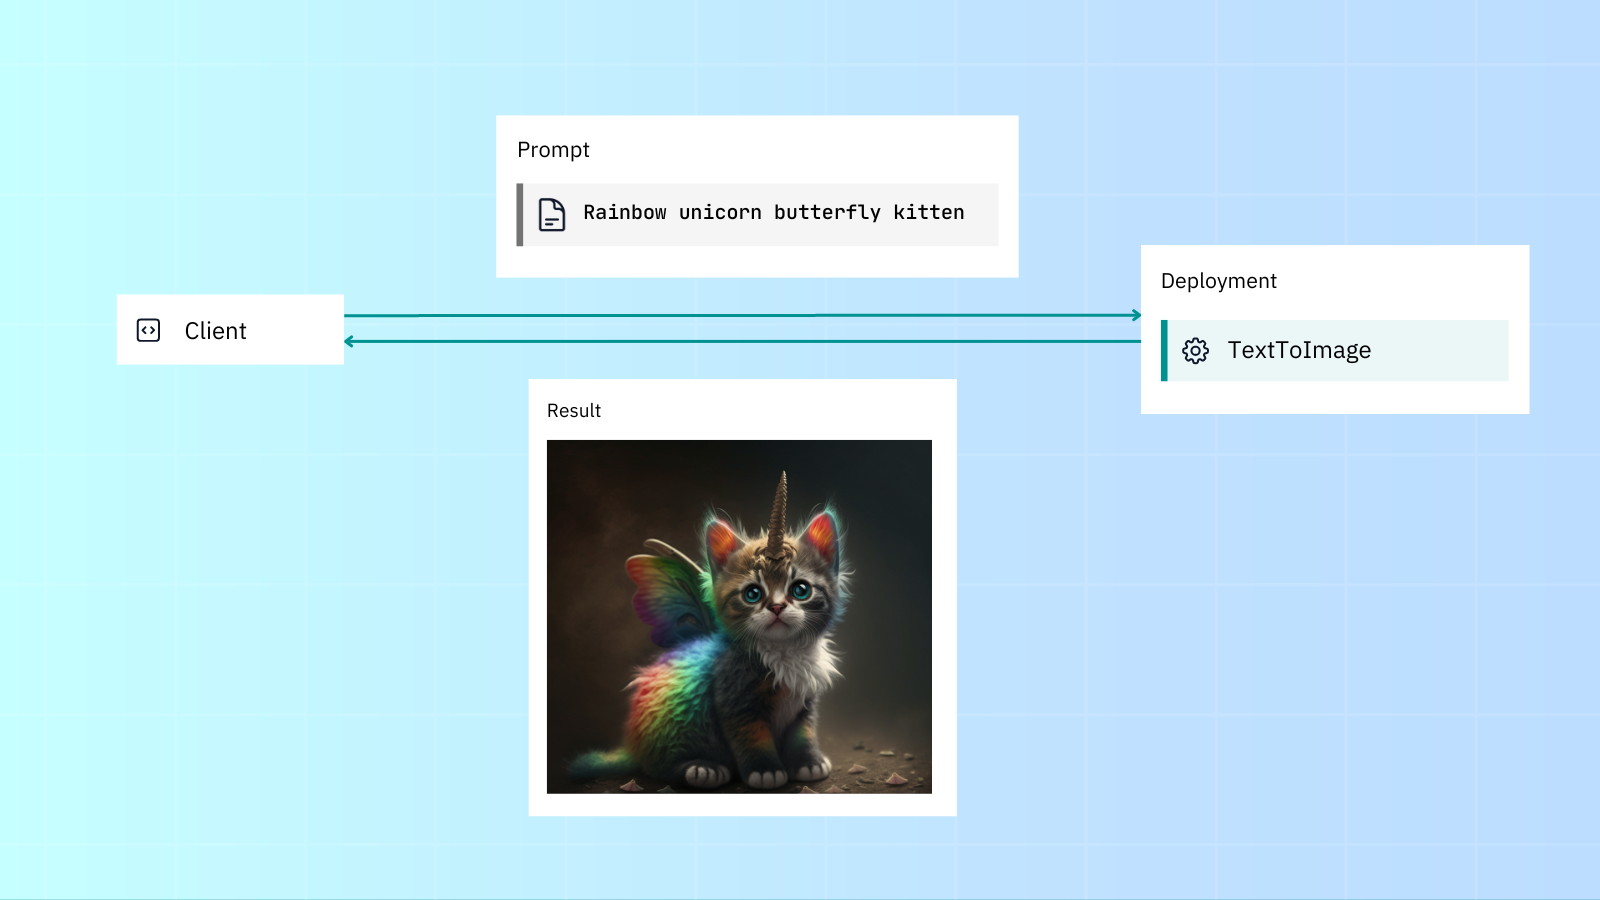
Client: Send and receive requests to your service#
Use Client to make requests to the service. As before, we use Documents as our basic IO format. We’ll use the text prompt rainbow unicorn butterfly kitten:
from jina import Client
from docarray import BaseDoc, DocList
from docarray.documents import ImageDoc

class ImagePrompt(BaseDoc):
    text: str


image_text = ImagePrompt(text='rainbow unicorn butterfly kitten')

client = Client(port=12345)  # use port from output above
response = client.post(on='/', inputs=DocList[ImagePrompt]([image_prompt]), return_type=DocList[ImageDoc])

response[0].display()
In a different terminal to your Deployment, run python client.py to generate an image from the rainbow unicorn butterfly kitten text prompt:

Scale up the microservice#
Python vs YAML
For the rest of this tutorial we’ll stick to using YAML. This separates our code from our Deployment logic.
Jina comes with scalability features out of the box like replicas, shards and dynamic batching. This lets you easily increase your application’s throughput.
Let’s edit our Deployment and scale it with replicas and dynamic batching to:
Create two replicas, with a GPU assigned for each.
Enable dynamic batching to process incoming parallel requests to the same model.

Here’s the updated YAML:
jtype: Deployment
with:
  timeout_ready: -1
  uses: jinaai://jina-ai/TextToImage
  env:
   CUDA_VISIBLE_DEVICES: RR
  replicas: 2
  uses_dynamic_batching: # configure dynamic batching
    /default:
      preferred_batch_size: 10
      timeout: 200
As you can see, we’ve added GPU support (via CUDA_VISIBLE_DEVICES), two replicas (each assigned a GPU) and dynamic batching, which allows requests to be accumulated and batched together before being sent to the Executor.
Assuming your machine has two GPUs, using the scaled Deployment YAML will give better throughput compared to the normal deployment.
Thanks to the YAML syntax, you can inject deployment configurations regardless of Executor code. Of course, all of this is possible via the Python API too.
